Legacy: Add AWS environments using AWS CloudFormation
You can add AWS environments to Sophos Cloud Optix using AWS CloudFormation.
Introduction
Warning
You must only use this help section if you opened your Sophos Cloud Optix account before November 17, 2020. If you opened your account after that date, you must use the instructions under Add your AWS environment.
Warning
If you're using AWS Organizations to centrally manage multiple AWS accounts, don't follow these instructions. Instead you must follow the instructions in Legacy: Add AWS environments with AWS Organizations.
To add a single AWS account using AWS CloudFormation, follow the instructions on Add your AWS environment to add the account in your Sophos Cloud Optix console.
You can also add multiple AWS accounts using AWS CloudFormation StackSets. To do this you must choose one AWS account as an admin account, then assign target member accounts. You use details from your Sophos Cloud Optix console to configure your AWS CloudFormation StackSet.
This starts Stack Instance creation in the specified target member accounts and adds those accounts to Sophos Cloud Optix.
You must do as follows:
- Collect information from Sophos Cloud Optix.
- Assign roles to your admin AWS account and target member AWS accounts.
- Configure the CloudFormation StackSet in the admin account.
- Create the CloudFormation StackSet.
More resources
Collect information from your Sophos Cloud Optix console
The information is used to link the StackSet to your Sophos Cloud Optix accounts.
Before creating AWS CloudFormation StackSets you must collect information from your Sophos Cloud Optix account. This is used later in the AWS Create StackSet assistant.
- Sign in to your Sophos Cloud Optix account.
- Click Environments > Add New Environment.
-
On the Add your cloud environment page, note the details under Add multiple AWS accounts using CloudFormation StackSets.
You must take note of the following parameters:
- DnsPrefixCloudTrail
- ExternalId
- ReqID
- CustomerId
- DnsPrefixFlow
-
Go to the AWS console to create your CloudFormation StackSets.
Assign a role to the AWS account chosen as your admin account
You must first choose an AWS account as your admin account.
Choose an AWS account to be your admin account. To assign the appropriate role to this account, do as follows:
- Sign into the AWS console using the account you have chosen.
-
Click the Launch Stack button here to go to the Quick stack create page with the correct parameters:

Note
You must click the Launch Stack button on this help page. It is configured with the correct parameters.
-
In Quick create stack check the Template URL is
https://avidcore.s3-us-west-2.amazonaws.com/aws/cloudformation/cloudformation/AWSCloudFormationStackSetAdministrationRole.yml. -
Check that the Stack name is
CloudOptixStackSetAdmin.This image shows the correct name.

-
Turn on I acknowledge that AWS CloudFormation might create IAM resources with custom names
- Click Create stack to create the role in your admin account.
- Sign out of your AWS console.
Assign roles to each target member AWS account
You assign roles for the designated target member accounts.
This process doesn't add the AWS admin account to Sophos Cloud Optix. It only adds the target member accounts. If you want to add the admin account, you must do it separately.
To create an AWS CloudFormation StackSet in every target member account, follow these instructions for each account:
-
Sign into the AWS console using an account you have chosen as a target account.
You must not be signed into your chosen admin account.
-
Click the Launch Stack button here to go to the Quick stack create page with the correct parameters:
Note
You must click the Launch Stack button on this help page. It is configured with the correct parameters.
-
In Quick create stack, check that the Template URL is
https://avidcore.s3-us-west-2.amazonaws.com/aws/cloudformation/cloudformation/AWSCloudFormationStackSetExecutionRole.yml.Check that the Stack name is
CloudOptixStackSetTargetThis image shows the correct name.

-
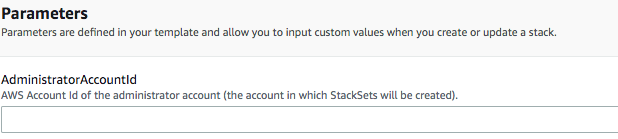
Under Parameters, enter the AWS Account ID of your admin account in AdministratorAccountId.
This image shows the account ID field.
-
Turn on I acknowledge that AWS CloudFormation might create IAM resources with custom names.
- Click Create stack to create the role in the target account.
- Sign out of your target member account's AWS console.
- Sign into the next target member account and repeat as required.
Configure CloudFormation StackSet in the admin AWS account
To create the AWS CloudFormation StackSet do as follows:
- Sign into the AWS console with your AWS admin account.
- Select the CloudFormation service.
- Select StackSets.
- Select Create StackSet.
-
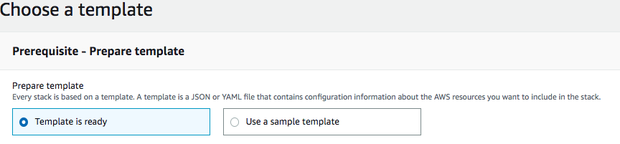
On the Choose a template page select Template is ready.
Here's an image showing template selection.
-
Select Amazon S3 URL as the template source.
-
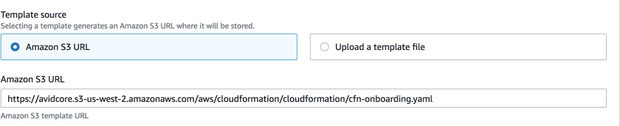
Enter the template URL:
https://avidcore.s3-us-west-2.amazonaws.com/aws/cloudformation/cloudformation/cfn-onboarding.yamlHere's an image showing the correct URL.
-
Click Next.
Create CloudFormation StackSet
Use Sophos Cloud Optix information in the Create StackSet assistant.
Use the parameters you obtained earlier from your Sophos Cloud Optix account to fill in the fields in the AWS CloudFormation StackSet assistant. This links your StackSets to Sophos Cloud Optix.
Warning
Don't delete or amend any fields that are pre-populated by Sophos Cloud Optix or on-boarding fails.
Ensure you are signed into your chosen AWS admin account and do as follows:
- Enter
OptixStackSetinto StackSet name on the Specify StackSet details page.Change the description if necessary. -
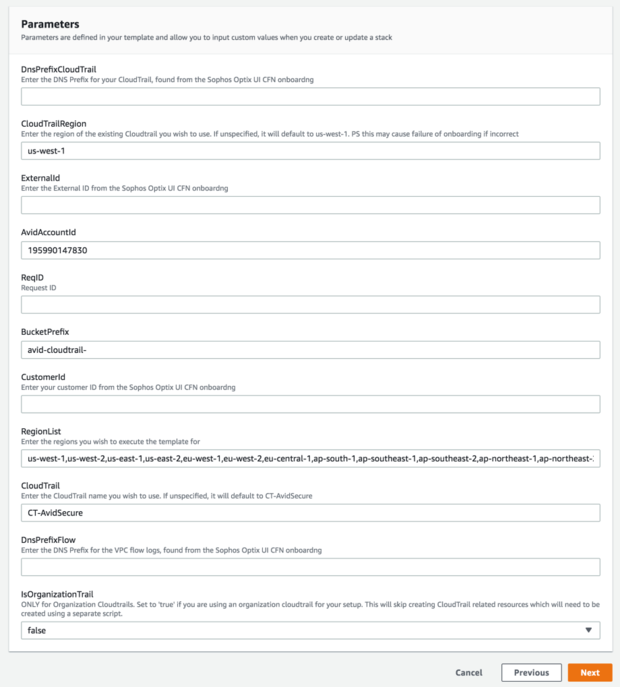
Enter the following parameters from Sophos Cloud Optix:
- DnsPrefixCloudTrail
- ExternalId
- ReqID
- CustomerId
-
DnsPrefixFlow
Don't change the SophosOptixAccountId field.
-
The pre-populated list in the RegionList must only be changed if some of your regions don't have a default Amazon Virtual Private Cloud (VPC). You must remove those regions from the RegionList field or the on-boarding process fails.
-
Don't change any other fields.
Here is an example of the Parameters menu with correct data.
-
Click Next. The Configure StackSet options page appears. You don't need to change anything.
- Click Next.
- On the Set deployment options page, select Deploy stacks in accounts.
-
In the Account numbers field, enter the account numbers of the target member accounts you want to add to Sophos Cloud Optix (the accounts in which you created the AWSCloudFormationStackSetExecutionRole).
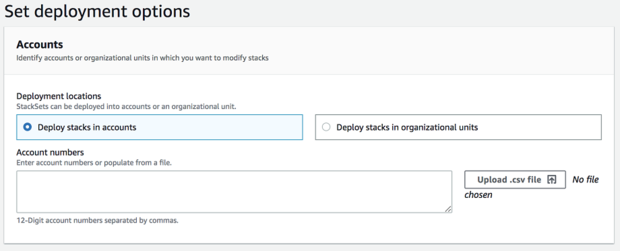
-
In Specify regions, choose one region.
The CloudFormation stack instance is created in this region for the target member account.
-
Click Next.
- A Review page appears, which shows you all the options you have entered. Check this carefully.
- Turn on I acknowledge that AWS CloudFormation might create IAM resources with custom names.
- Close the assistant. This creates the stack instance and adds the target member accounts to Sophos Cloud Optix.
Adding EKS clusters
After adding your AWS account to Sophos Cloud Optix, you can add Amazon Elastic Kubernetes Service (EKS) clusters.
You must add these clusters to Sophos Cloud Optix separately, using the Amazon CLI script provided by Sophos. See Legacy: Add your Amazon EKS clusters.