Configure remote access SSL VPN as a full tunnel
When you configure remote access SSL VPN connections in full tunnel mode, all traffic from remote access SSL VPN users flows through the firewall. They can only access the permitted network resources you select in the SSL VPN policy.
Users can establish the connection using the Sophos Connect client.
Restriction
Currently, the Sophos Connect client doesn't support macOS for SSL VPN. It also doesn't support mobile platforms for IPsec and SSL VPN. For these endpoints, you can use the OpenVPN Connect client. See Sophos Connect client: Compatibility with platforms.
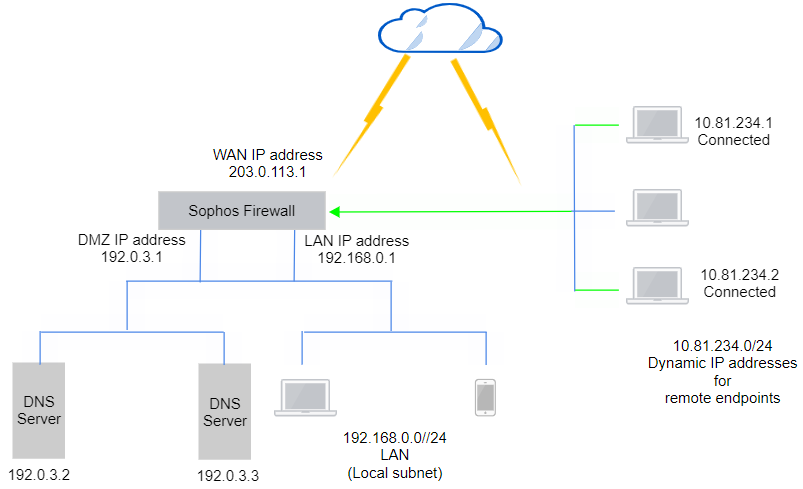
Network diagram
See the video Configure remote access IPsec and SSL VPN.
Tip
Using the SSL VPN assistant (Remote access VPN > SSL VPN > Assistant) helps you easily configure the SSL VPN global settings, SSL VPN policy, and user portal settings shown in this article. It automatically creates the required firewall rule.
Prerequisites
Make sure you've configured IP hosts for the network resources remote users can access. You must also configure users and groups in the firewall.
Create IP host for local subnet
Here's an example subnet for the network resources remote clients can access.
- Go to Hosts and services > IP host and click Add.
-
Enter a name and network for the local subnet.

-
Click Save.
Create a user group and user
Create a user group for remote SSL VPN and add a user if you haven't already done it.
- Go to Authentication > Groups and click Add.
-
Specify the settings.
Name Value Name Remote SSL VPN group Surfing quota Unlimited internet access Access time Allowed all the time -
Click Save.
- Go to Authentication > Users and click Add.
-
Specify the settings.
Name Value Username john.smith Name John Smith Group Remote SSL VPN group -
Click Save.
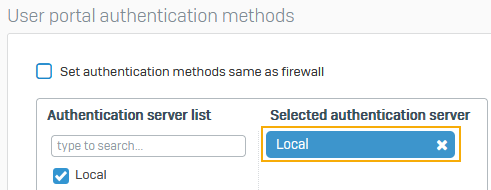
Check authentication services
This example sets the user portal and SSL VPN authentication methods to local authentication. Sophos Firewall then acts as the authentication server.
- Go to Authentication > Services.
-
Under User portal authentication methods, do as follows:
- Clear Set authentication methods same as firewall.
- Check that the Selected authentication server is set to Local.
-
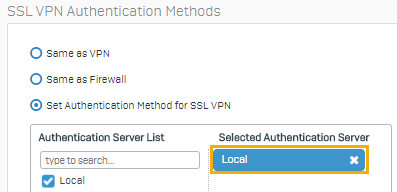
Scroll to SSL VPN authentication methods.
-
Check that the authentication server is set to Local.
Note
Alternatively, you can select an authentication server, such as the Active Directory server you've configured under Authentication > Servers.
SSL VPN configurations
Specify the required SSL VPN settings, configure an SSL VPN policy, and, optionally, the provisioning file.
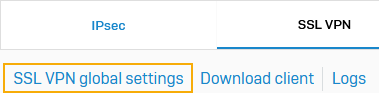
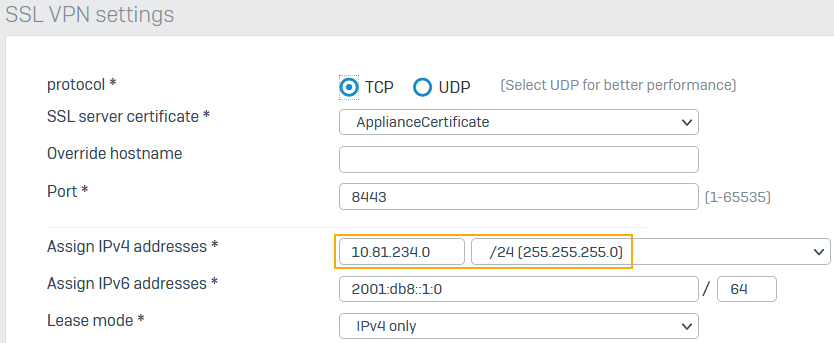
SSL VPN global settings
When SSL VPN clients connect to the firewall, it assigns IP addresses from the subnet you enter here. You must use a private address.
-
Go to Remote access VPN > SSL VPN and click SSL VPN global settings.
-
Enter the private IP address and subnet mask.
When connections are established, the firewall leases IP addresses from the subnet to remote users.
-
Enter the following DNS settings:
- Enter the primary and secondary IPv4 DNS server addresses.
-
For Domain name, enter the DNS suffix (example:
company.comortest.local) for the hostnames of permitted resources.The suffix is added to the remote endpoint's network adapter. It's appended to hostnames forming an FQDN to resolve the endpoint's DNS queries.

-
Click Apply.
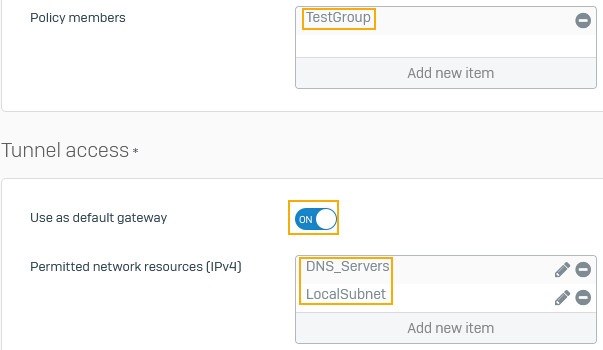
Add an SSL VPN policy
Create a policy that allows users in the remote SSL VPN group to establish VPN connections and access resources on the local subnet.
- Go to Remote access VPN > SSL VPN and click Add.
- Enter a name.
- Select the policy members.
-
Turn on Use as default gateway to establish a full tunnel.
All the traffic of remote users, including internet traffic, enters the firewall through the established tunnels.
-
For Permitted network resources that members are allowed to access, this example selects the following:
LocalSubnet-
DNS_ServersTo allow DNS resolution, you must select the DNS servers.
-
Click Apply.
(Optional) Create a provisioning file
The provisioning file automatically fetches the .ovpn configuration through the user portal. It also fetches some configuration changes you make later. See Provisioning file templates.
Restriction
The provisioning file only supports Windows devices. You can only use it with the Sophos Connect client.
- Open a new file in a text editor, such as Notepad.
-
Copy and edit the settings to meet your network requirements using the syntax on Provisioning file settings.
You must specify the hostname or IP address of the gateway. The other fields are optional.
Example
[ { "gateway": "203.0.113.1", "user_portal_port": 443 } ] -
Save the file with a
.proextension. -
To install it on users' endpoints, use one of the following options:
-
Email the provisioning file to users.
Users must click Import connection in the Sophos Connect client and select the file. Alternatively, they can double-click the
.profile to import it. See Remote access IPsec and SSL VPN. -
Use an Active Directory Group Policy Object (GPO) to automatically import it to the Sophos Connect client on users' endpoints after start-up. See Import VPN provisioning file through GPO.
-
Allow traffic
You must allow SSL VPN from the WAN zone and configure a firewall rule to allow SSL VPN traffic.
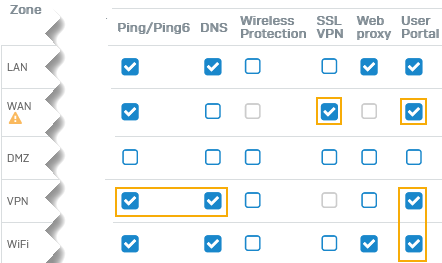
Check device access settings
You must allow access to some services for remote users from the required zones.
- Go to Administration > Device access.
-
Under SSL VPN, select WAN to allow remote users to establish SSL VPN connections.
-
Under User portal, select the following:
-
WAN and Wi-Fi: Users can access the user portal from the WAN and Wi-Fi zones. They can then download the VPN client and configuration from the user portal. LAN is selected by default.
Allowing WAN access is a security risk.
-
VPN: After users establish a VPN connection, they can access the user portal through VPN. You can then turn off access from WAN.
-
-
(Optional) Under Ping/Ping6, select VPN.
Users can ping the firewall's IP address through VPN to check connectivity.
-
Under DNS, select VPN.
Users can resolve domain names using the VPN tunnel.
-
Click Apply.
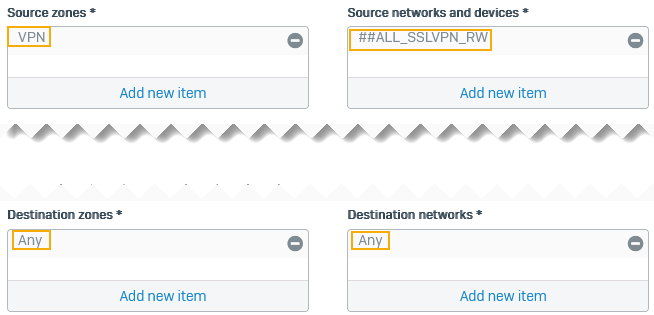
Add a firewall rule
- Go to Rules and policies > Firewall rules.
- Select IPv4 or IPv6.
- Click Add firewall rule and New firewall rule.
- Enter a rule name.
- For Source zone, select VPN.
-
For Source networks and devices, select ##ALL_SSLVPN_RW or ##ALL_SSLVPN_RW6.
The firewall dynamically adds IP addresses leased to remote users who've established a connection to these hosts.
-
For Destination zones, select Any, to allow remote users' traffic from VPN to any zone, including LAN, DMZ, and WAN zones.
-
For Destination networks, select Any.
The default gateway setting ensures remote users' internet traffic flows through the firewall. So, the firewall rule must allow traffic from the specified source networks to any network.
-
Click Save.
Here's an example:
User actions
Users can download the Sophos Connect client from the user portal and install it. They can import the .pro file you provide or download the SSL VPN configuration and import it to the client. See Remote access IPsec and SSL VPN.