Create a site-to-site RED tunnel
Set up a site-to-site RED tunnel between two Sophos Firewall devices without deploying a RED device. In this configuration, one firewall acts as the server and the other as the client.
Objectives
You'll learn to do the following:
- Add a RED interface on the Firewall RED Server and Firewall RED Client.
- Add a static route on both firewalls so that internal networks have a route across the RED tunnel.
- Add a firewall rule on both firewalls for tunnel traffic.
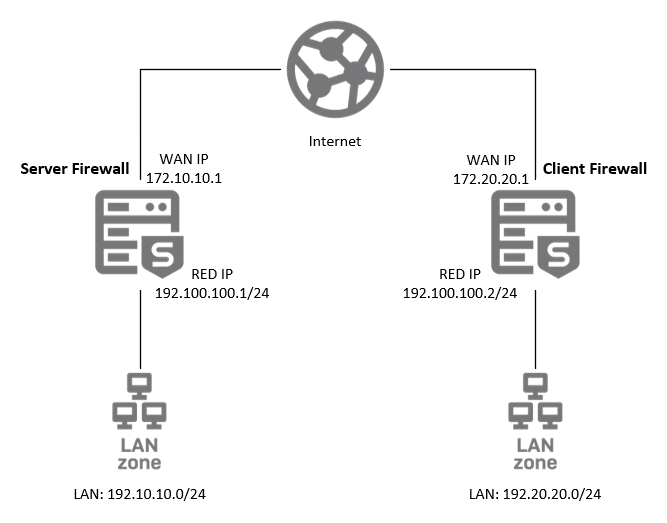
Network diagram
Add a RED interface on the Firewall RED Server
The Firewall RED Server listens for incoming connections, and the Firewall RED Client initiates the outgoing connection. Translating the Firewall RED Server's address may interfere with incoming connections. We recommend that you don't use NAT for the Firewall RED Server.
- On the Firewall RED Server, go to System services > RED and turn on the RED provisioning service.
- Go to Network > Interfaces, click Add interface, and click Add RED.
-
Configure as follows:
Setting Description Value Branch name RED interface name REDserverType RED interface type Firewall RED serverTunnel ID Tunnel ID setting AutomaticRED IP Firewall RED Server's RED IP address. 192.100.100.1Zone RED interface zone LAN -
Click Save.
The firewall generates a provisioning file.
-
On the RED interface, click Menu
 and download the provisioning file.
-
Copy the file to a network location or removable drive that you can access from the Firewall RED Client.
Add a RED interface on the Firewall RED Client
- Go to System services > RED and turn on the RED provisioning service.
- Go to Network > Interfaces, click Add interface, and click Add RED.
-
Configure as follows:
Setting Description Value Branch name RED interface name REDclientType RED interface type Firewall RED clientFirewall IP/hostname Firewall RED Server's WAN IP address. 172.10.10.1Provisioning file The provisioning file you downloaded from the Firewall RED Server. Click Browse and select the provisioning file you downloaded from the Firewall RED Server. RED IP Firewall RED Client's RED IP address. 192.100.100.2Zone RED interface zone LAN -
Click Save.
Add static routes
You must configure static routes on both firewalls so that internal networks have a route across the RED tunnel.
- On the Firewall RED Server, go to Routing > Static routes.
- Under IPv4 unicast route, click Add.
-
Configure as follows:
Setting Description Value Destination IP / Netmask Firewall RED Client's LAN network and netmask. 192.20.20.0and/24 (255.255.255.0)Gateway Firewall RED Client's RED IP address. 192.100.100.2Note
ARP requests are sent to identify the interface over which the destination IP address behind the peer RED is reachable. To make sure these requests reach the destination, don't select an interface.
-
Click Save.
- On the Firewall RED Client, go to Routing > Static routes.
- Under IPv4 unicast route, click Add.
-
Configure as follows:
Setting Description Value Destination IP / Netmask Firewall RED Server's LAN network and netmask. 192.10.10.0and/24 (255.255.255.0)Gateway Firewall RED Server's RED IP address. 192.100.100.1Note
ARP requests are sent to identify the interface over which the destination IP address behind the peer RED is reachable. To make sure these requests reach the destination, don't select an interface.
-
Click Save.
Add firewall rule
For traffic to pass between the two firewalls, you must create a LAN-to-LAN or a similar rule on each firewall.
Do as follows on the Firewall RED Server and Firewall RED Client:
- Go to Rules and policies > Firewall rules.
- Select IPv4, click Add firewall rule, and click New firewall rule.
-
Configure as follows:
Setting Value Rule name LAN-to-LAN Source zones LAN Destination zones LAN -
Click Save.