Set up a RED device manually
To set up RED devices manually, you must download the provisioning file for the RED interface and save it to a USB stick.
Objectives
To set up a RED device manually, do as follows:
- Configure an NTP server on the firewall.
- Add a custom zone for RED devices.
- Add a RED interface and download the provisioning file.
- Install the provisioning file on the RED device.
- Create a firewall rule for tunnel traffic.
Configure an NTP server
When you manually set up a RED device, the firewall must act as an NTP server.
To configure the firewall as an NTP server, do as follows:
- Go to Administration > Time and click Use custom NTP server.
- In the Search/Add field, type the IP address of the firewall and click Add
 .
. - Click Apply.
Add a custom zone for RED devices
When you add the RED interface, if you set the RED device in the LAN zone, the firewall applies the same rules to the RED device as the rest of the LAN network. To maintain a logical separation between the RED and LAN networks, add a custom zone for RED devices or use an existing zone, such as VPN or WiFi.
To add a custom zone for RED devices, do as follows:
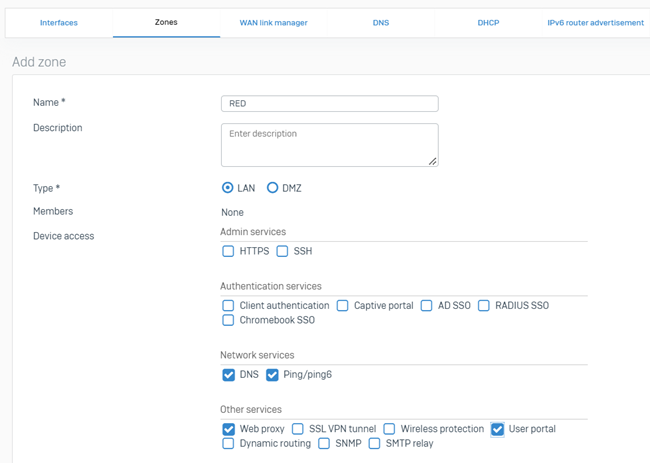
- Go to Network > Zones and click Add.
- Enter a name for the zone. For example, RED.
- For Type, select LAN or DMZ. See Add a zone.
- For Device access, select the service you want for this zone.
- Click Save.
Add a RED interface
Create an interface for the RED that you're manually setting up.
- Go to System services > RED and turn on the RED provisioning service.
- Go to Network > Interfaces, click Add interface, and select Add.
- Enter a branch name and select your RED device type.
- For Device deployment, select Manually via USB stick.
- Specify the other RED model settings as required.
- Under RED network settings, select the zone you created for RED devices.
-
Click Save.
The firewall generates a provisioning file for the interface.
Install the provisioning file
Download the provisioning file associated with the RED interface and provide the file to the device using a USB stick.
- Turn off the RED.
- Go to Network > Interfaces.
-
For the RED interface, click Menu
 , and download the provisioning file.
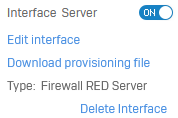
-
Move the file to the root directory of the USB stick.
- Plug the USB stick into the RED.
-
Turn on the RED.
The RED gets the configuration from the USB stick.
Create a firewall rule for tunnel traffic
You can configure firewall rules for RED devices based on their zones.
If you use an existing zone, previously created firewall rules determine how traffic is routed. Make sure the rules that apply to the selected zone don't break security for your internal networks. For example, the VPN zone prevents the firewall from resolving DNS requests. The VPN zone instead uses DHCP to distribute a different DNS server.
To create a firewall rule for tunnel traffic, do as follows:
- Go to Rules and policies > Firewall rules.
- Select IPv4 or IPv6, select Add firewall rule, and then select New firewall rule.
- For Source zones, select the zone you created for RED devices.
- Select a network in Source networks and devices if you want the firewall rule to match a network within the zone. Otherwise, select Any.
- For Destination zones, select LAN and WAN.
- Select a network in Destination networks if you want the firewall rule to match a network within the zone. Otherwise, select Any.
- Click Save.