Troubleshooting authentication
Investigate and resolve common authentication issues.
You'll typically need access to Sophos Firewall, the authentication server, and an endpoint device that fails authentication to troubleshoot authentication issues.
Client devices fail authentication when Kerberos and NTLM are configured.
Some common issues for authentication failure are as follows:
- Configuration errors.
- Domain join failures.
- The key version number (KVNO) in Kerberos doesn't match between endpoints and Sophos Firewall.
To resolve the issue, do as follows:
- Go to Authentication > Servers.
-
Click your AD server and then click Test connection.
If the connection fails, you must resolve the AD connectivity issues before you continue.
-
Go to Rules and policies > Firewall rules to check whether there's a rule in place to allow Kerberos and NTLM traffic. If there isn't a rule, you must create one.
- Go to Administration > Device access, and make sure AD SSO is configured for the zone that clients authenticate from. This is typically your LAN zone.
- If you configure Sophos Firewall as an explicit proxy, make sure you use the hostname in the browser settings. If you use an IP address, the client allows only NTLM authentication.
- Sign in to the firewall command line interface.
- Select option 5. Device Management, then select option 3. Advanced Shell.
-
Use the following command to check the
nasmservice is running:service -S | grep -i "nasm" -
Check the Kerberos keytab matches on both the endpoint and Sophos Firewall.
-
On the endpoint computer, open a command prompt and run the following commands:
setspn -Q */proxyhostnameklistChange
proxyhostnameto the FQDN of Sophos Firewall.
-
-
Open PowerShell.
-
To get the KVNO number from AD, run the following commands:
Run the following command:
get-aduser <USERNAME> -property msDS-KeyVersionNumberChange
<USERNAME>to the username of the user you're querying.Run the following command:
get-adcomputer <COMPUTERNAME>$ -property msDS-KeyVersionNumberChange
<COMPUTERNAME>to the name of the machine you're querying. -
Open the advanced shell in Sophos Firewall.
-
Run the following command:
chroot /content/nasm -
At the next prompt, run the following command:
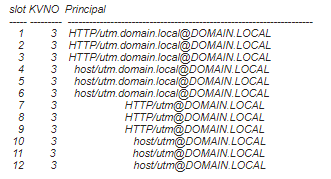
/oss/klist -e -k /tmp/krb5.keytabThe output will look similar to this:
-
Check that the proxy name matches on both the endpoint and Sophos Firewall. This is case-sensitive.
- Check that the KVNO matches between both the endpoint and Sophos Firewall.
- If the proxy name doesn't match between the endpoint and Sophos Firewall, make sure the host record in AD for the firewall matches the hostname configured under Administration > Admin settings > Hostname.
- If the KVNO doesn't match, the user must sign out and back into their account, or you must rejoin Sophos Firewall to the domain. Normally this issue is caused when the hostname of Sophos Firewall is changed.
Terminal server users are unable to sign in
Users of terminal servers such as Citrix must use a thin client (SATC) to sign in.
There can be several reasons that users are unable to authenticate. To check that your systems are configured correctly, and correct any issues you find, do as follows:
- Sign in to the Sophos Firewall command line interface (CLI).
- Select option 4. Device Console.
-
Run the following command:
system auth thin-client showThis lists the IP addresses of your terminal servers. Make sure all expected IP addresses are shown.
-
If the terminal server isn't shown in the steps above, add it using the following command:
system auth thin-client add citrix-ip <IPADDRESS>Replace
IPADDRESSwith the IP addresses of the server. -
On all terminal servers running SATC, open SATC, go to the Sophos Settings tab, and check that the correct IP address is configured for Sophos Firewall under Sophos IP Address. Also, check that the service is running in the Windows task manager.
- Check Authentication Server Settings in Sophos Firewall. Go to Authentication > Services and make sure the Active Directory server is selected under Firewall Authentication Methods.
- Check if any proxy or security software installed on the server might change the source port. If there is, Sophos Firewall has a port mismatch, and the traffic is treated as unauthenticated.
-
If you use Internet Explorer, to minimize or turn off User Account Control (UAC), do as follows:
- Log in to your Windows AD server. Click Start, and then click Control Panel.
- In Control Panel, click User Accounts.
- In the User Accounts window, click User Accounts.
-
In the User Accounts tasks window, click Turn User Account Control on or off.
Note
User Account Control is a security component that allows an administrator to enter credentials during a non-administrator's session to perform administrative tasks.
-
Turn off Use User Account Control (UAC) to help protect your computer and click OK.
- Click Restart Now to apply the change right away.
Note
If UAC is currently configured in Admin Approval Mode, the User Account Control message appears. Click Continue.
Note
If UAC is turned on, it doesn't allow the SATC client to send the traffic to Sophos Firewall. As SATC sends the username over port 6060, users don't appear in the live user list. This happens when the SATC user accesses the internet with Internet Explorer.
SATC LSP registers with Winsock for Sophos Firewall to understand the user traffic. When UAC is turned on, Internet Explorer bypasses the LSP registration.
There's no issue with UAC with the Firefox web browser.
To turn off Enhanced Protected Mode, do as follows:
- Launch Run from the Windows Start menu.
- In the Run window, type inetcpl.cpl and then click OK.
- In the Internet Properties window, click the Advanced tab.
- Scroll down to Security and then turn off Enable Enhanced Protected Mode.
- Click Apply and then OK.
To update the Runs network service in-process settings, do as follows:
- In your chrome browser, go to chrome://flags.
- Search for Runs network service in-process.
- Switch the setting to Enabled.
Users will now be able to authenticate via SATC as expected.