Sophos NDR on ESXi or Hyper-V
You must have the Sophos Network Detection and Response integration license pack to use this feature.
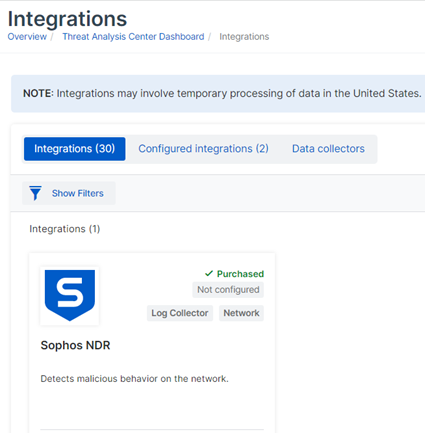
Sophos Network Detection and Response (NDR) detects malicious behavior on your network.
You can integrate Sophos NDR with Sophos Central so that its detections are available for investigation in the Threat Analysis Center.
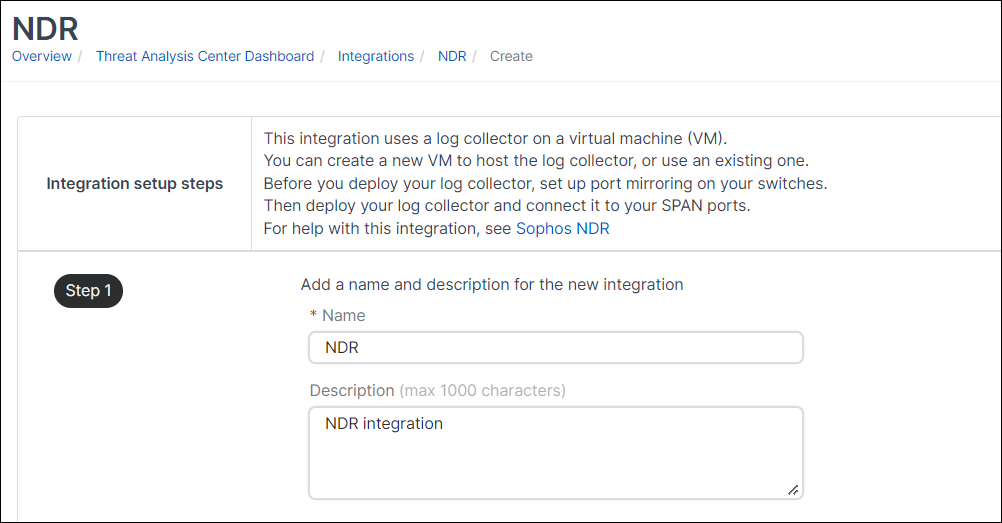
The integration uses a log collector hosted on a virtual machine (VM). Together they're called an appliance. The appliance receives data and forwards it to the Sophos Data Lake.
Currently Sophos NDR supports VMware ESXi 6.7 or later and Microsoft Hyper-V 6.0.6001.18016 (Windows Server 2016) or later.
The main steps are as follows:
- Check the requirements.
- Configure an integration. This configures an image to use on a VM.
- Configure your switches so NDR can see traffic.
- Download and deploy the image on your VM. This becomes the appliance.
Requirements
Currently Sophos supports VMware ESXi 6.7 Update 3 or later and Microsoft Hyper-V.
The VM that runs the appliance has system and network access requirements. For full details, see Appliance requirements.
For details of CPU microarchitecture and CPU flags required, see CPU requirements.
For a quick guide to resizing the VM for the best performance, see Sophos NDR appliance size guide.
Configure an integration
To configure the integration, do as follows:
- In Sophos Central, go to Threat Analysis Center > Integrations > Marketplace.
-
Find and click Sophos Network Detection and Response (NDR).
-
On the NDR page, in Data Ingest (Security Alerts), click Add Configuration.
Integration setup steps appears.
Configure the VM
-
In Step 1 enter a name and description for the integration.
-
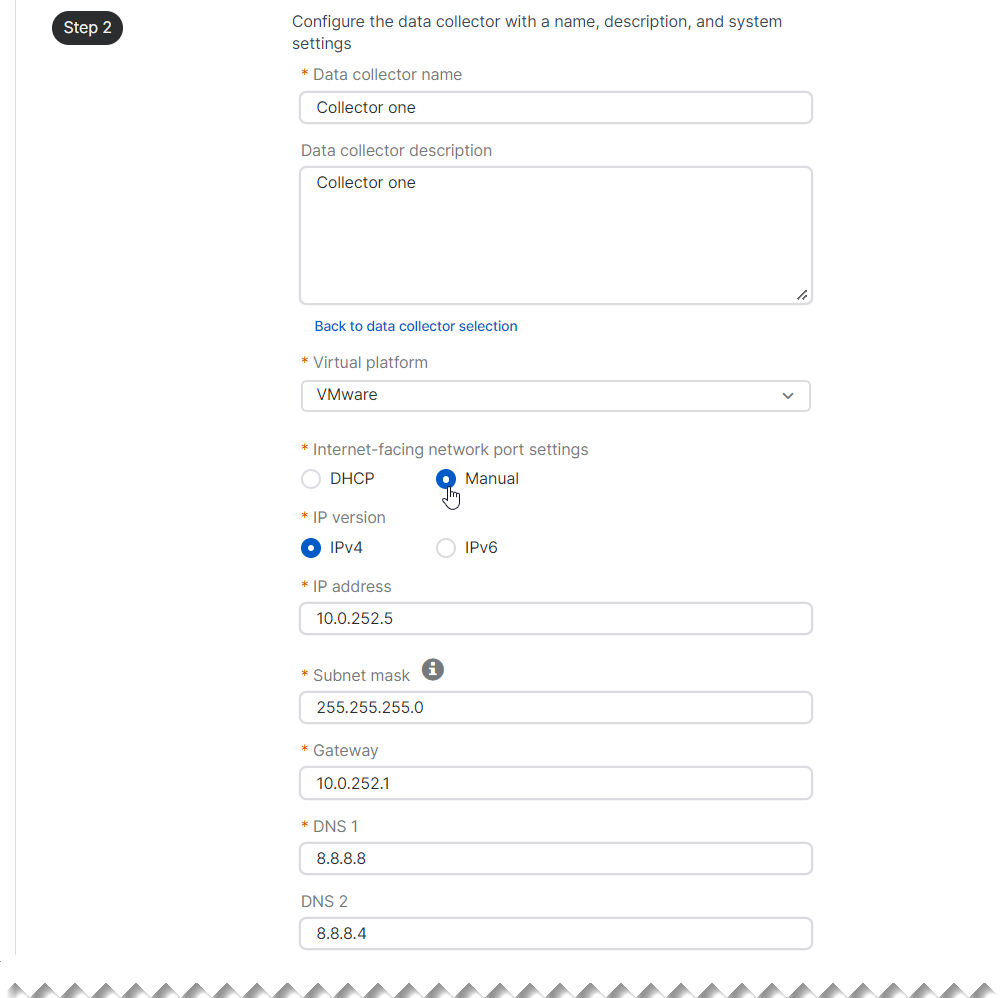
In Step 2, select or create the appliance that will collect NDR logs.
You can only have one NDR integration per appliance.
If you need a new appliance, click Create new appliance.
If you want to use an existing appliance, select it from the drop-down list and skip to Step 3 to set exclusions.

-
To create a new appliance, do as follows:
-
Enter the appliance name and description. You must enter a unique name.
-
Select the virtual platform. Currently we only support VMware ESXi 6.7 Update 3 or later, and Microsoft Hyper-V.
-
Specify the internet-facing network ports.
-
Select DHCP to assign the IP address automatically.
Note
If you select DHCP, you must reserve the IP address.
-
Select Manual to specify network settings. For example:
-
IP address: 10.0.252.5
- Subnet mask: 255.255.255.0
- Gateway address: 10.0.252.1
- DNS 1: 8.8.8.8
- DNS 2: 8.8.4.4
-
-
-
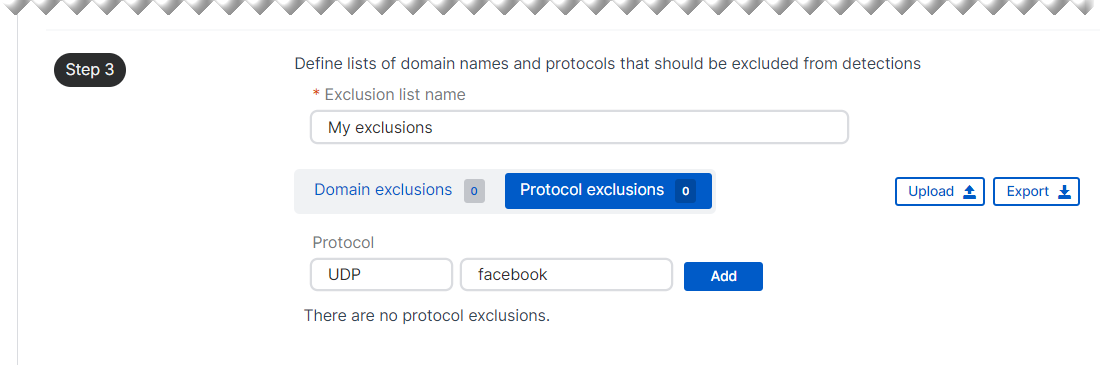
In Step 3, exclude specific domains and protocols from checking. For example, you might do this if you have a domain that causes false positives.
You can set up your exclusions later, but you must enter an exclusion list name now.
- Enter Exclusion list name.
- To exclude a domain, click Domain exclusions. Enter the domain name, for example
sophos.com, and click Add. -
To exclude a protocol, click Protocol exclusions. You can enter information in either or both of the fields:
- In the first field, enter a master protocol. For example,
TCPorUDP. - In the second field, enter a sub-protocol (website). For example,
facebook.
If you enter information in both fields, we assemble them into one string with a single dot separator.
We don't recommend excluding a master protocol completely. Only do this if a high-traffic protocol that isn't usually risky, like a routing protocol, generates too much data.
The screenshot shows example information.
- In the first field, enter a master protocol. For example,
-
Click Add.
You can export your exclusions as a JSON file. You can also upload exclusions to the list from a JSON file you've exported previously.
-
Click Save.
In the NDR page, you see the new integration in the list of configured integrations.
Next configure your switches so that the NDR appliance will be able to monitor your network traffic.
Configure your switches
Before you download and deploy the Sophos NDR VM, you must set up port mirroring, also known as Switched Port Analyzer (SPAN). This forwards a copy of incoming and outgoing traffic from a switch's ports or VLANs to another switch port for analysis.
You must configure port mirroring for both virtual internal and physical external network traffic.
When you deploy your NDR VM appliance later, you’ll be able to connect it to your SPAN ports so that NDR can monitor network traffic.
The instructions for port mirroring depend on whether you're setting up NDR on ESXi or Hyper-V. Click the tab for your virtual environment below.
If you're using ESXi, port mirroring involves the following steps:
- Configure virtual switches.
- Configure a physical switch.
Configure virtual switches
To set up port mirroring for virtual, internal switches, do as follows:
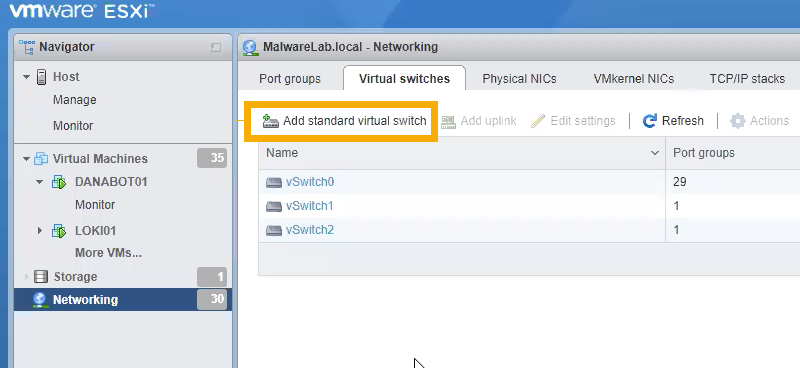
- In ESXi, go to Networking. On the Virtual switches tab, select a switch to use for port mirroring.
If you don’t already have a switch to use, click Add standard virtual switch to add a new one and add port groups to it.
-
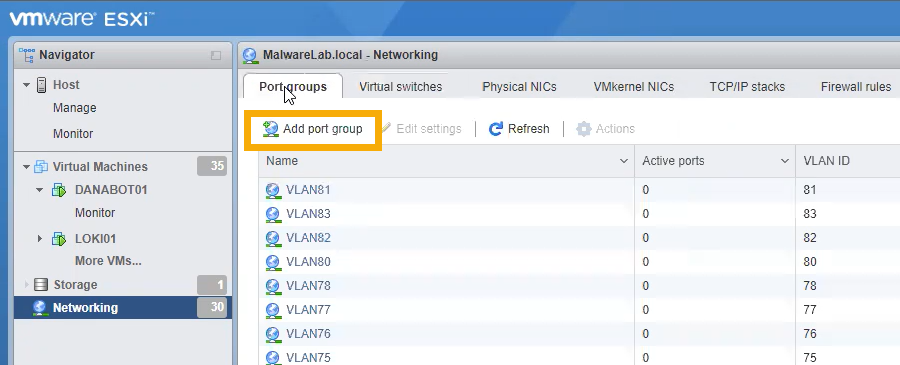
On the Port groups tab, click Add port group.
-
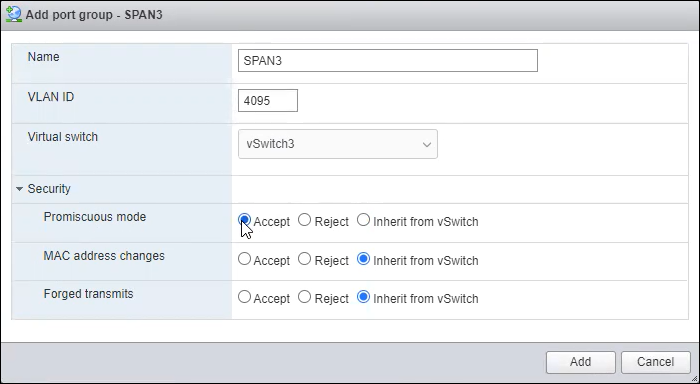
In the settings for the new port group, do as follows:
- Enter a name.
- Set the VLAN ID to 4095. This allows all other port groups already on the switch to forward traffic to the new port group.
- Click Security and set Promiscuous mode to Accept.
- Click Add.
You've set up forwarding for your virtual internal network traffic. Next do the same for physical external traffic, as described in the steps that follow.
-
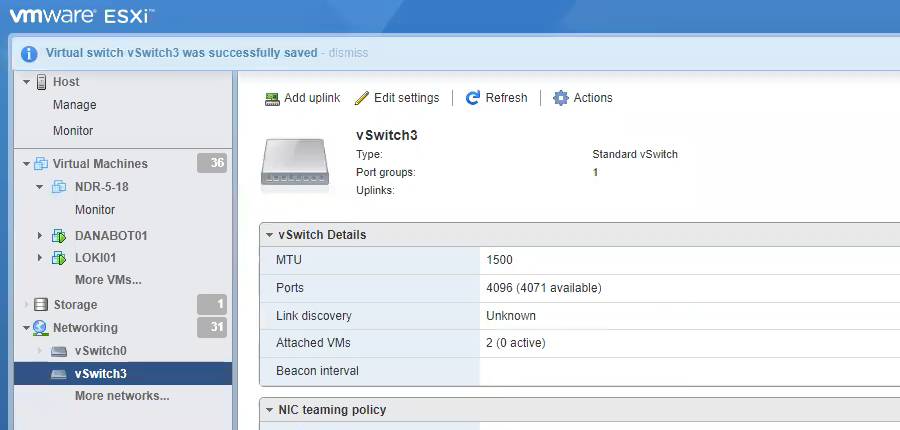
In ESXi, select or create another virtual switch that will handle physical external traffic sent to it by a physical switch on your network.
-
Configure the switch as follows:
- Go to Port groups and click Add port group.
- Enter a name.
- Set VLAN ID to 4095.
- Click Security and set Promiscuous mode to Accept.
Next you connect your virtual switch to your physical network so that it can receive external traffic.
-
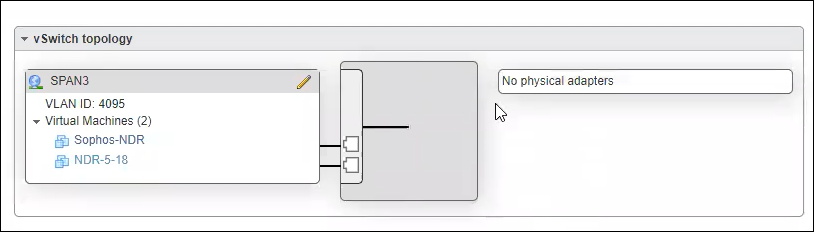
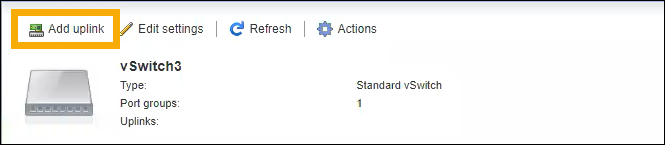
In the ESXi left menu, go to Networking and select the switch you want to use for external traffic.
-
In the switch details, look for vSwitch topology. You can see “No physical adapters”.
-
Click Add uplink.
-
In Uplink 1, select a NIC (Network Interface Card) that's available. This connects the virtual switch to a port on your ESXi server.
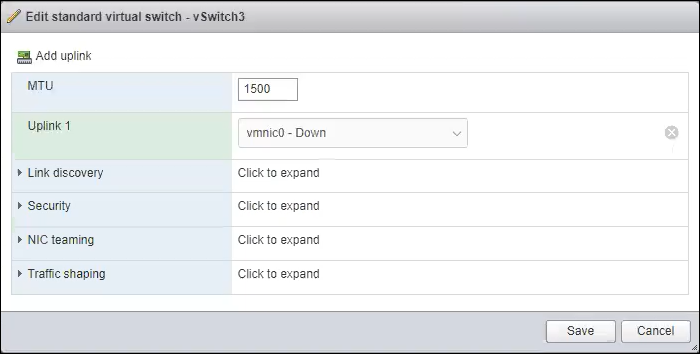
-
In Network topology, check that you can see a physical adapter connected.
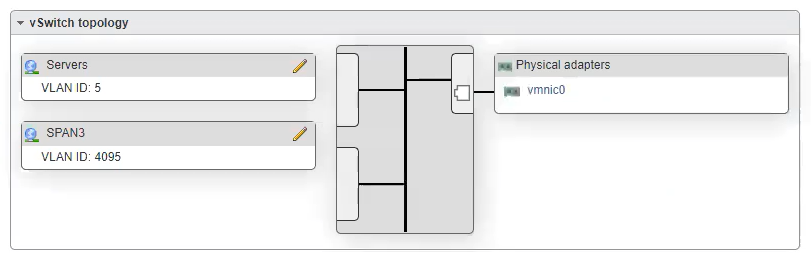
-
Go to your physical switch and use a cable to connect directly to the port on your ESXi server.
Next you need to set up mirroring on your physical switch.
Configure a physical switch
This section describes setting up port mirroring on a Sophos switch. Setup steps for other switches differ.
To set up mirroring, do as follows:
- In Sophos Central go to Switches.
-
Select the switch you want to configure and click Run commands.

-
In the Run switch commands console, enter the commands to mirror all traffic. In this example, the commands will mirror all incoming and outgoing traffic on ports 1-4, and send it out on port 8.
configure terminal
monitor session 1 destination interface gigabitethernet 0/8 allow-ingress
monitor session 1 source interface gigabitethernet 0/1 both
monitor session 1 source interface gigabitethernet 0/2 both
monitor session 1 source interface gigabitethernet 0/3 both
monitor session 1 source interface gigabitethernet 0/4 both
save
end
show monitor session 1

-
Click Execute. The console shows the commands as they run on a green background.
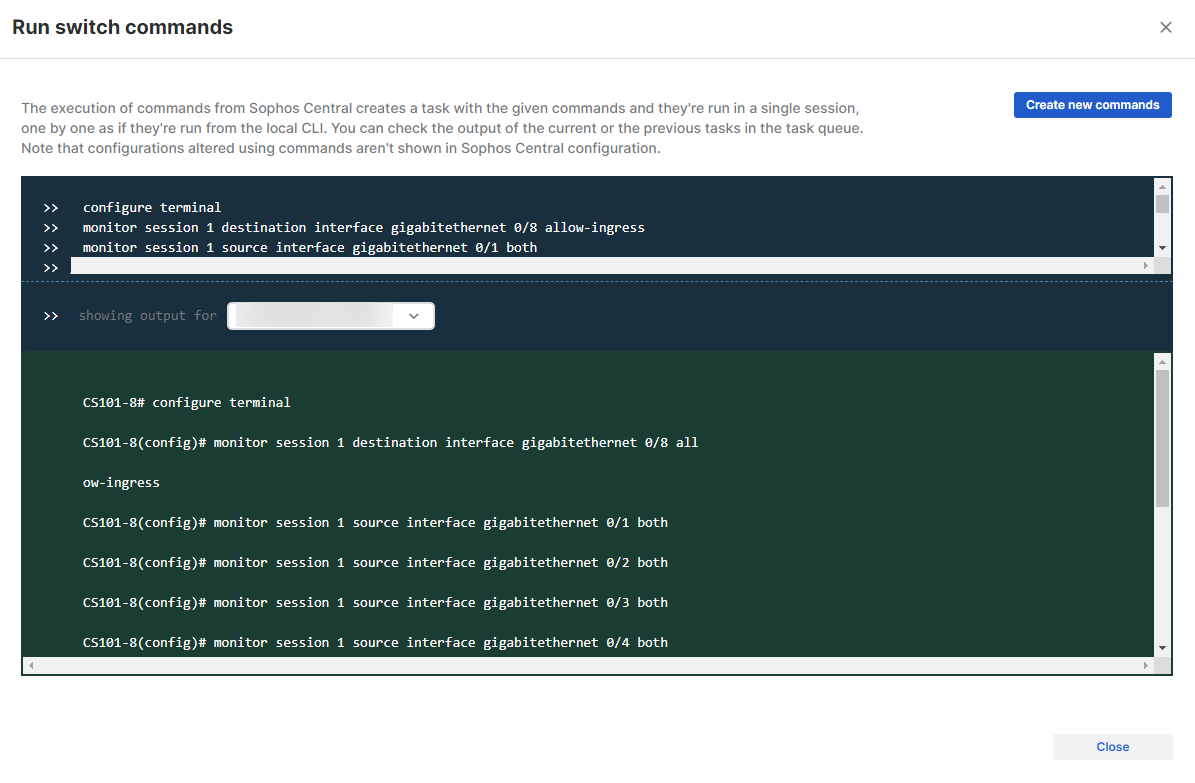
-
When the last command is run, the console shows the completed configuration. Click Close.

You've finished setting up forwarding of traffic to SPAN ports. Later you'll configure Sophos NDR to monitor that traffic.
If you're using Hyper-V, port mirroring involves the following steps:
- Configure a traffic mirroring port with Hyper-V.
- Attach a SPAN Virtual Interface to the virtual switch.
- Turn on Microsoft NDIS capture extensions.
- Configure the switch's mirroring mode.
- Validate traffic mirroring.
For instructions, see Configure traffic mirroring with a Hyper-V vSwitch.
Next you download the NDR VM image.
Download the VM image
Now you download the NDR image you need to deploy and boot the new VM.
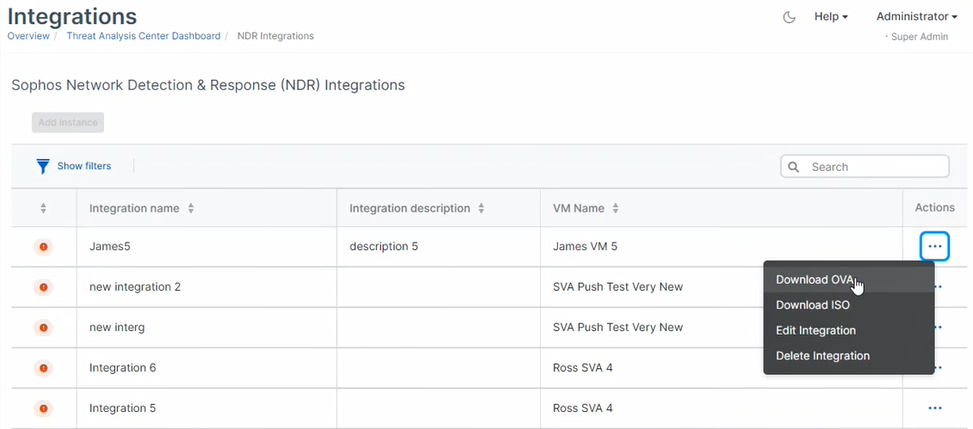
-
Next to the new integration, click
 in the Actions column, and select the download for your platform, for example Download OVA file for ESXi.
You see the download start.
-
Hover over the icon to the left of the integration name. You now see "Waiting for deployment".
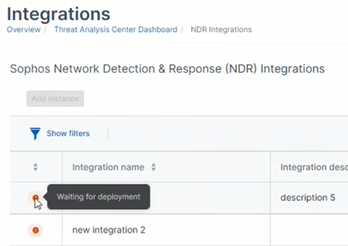
You're ready to deploy the VM.
Deploy the VM
Click the tab for your platform below to see the instructions.
Restriction
If you're using ESXi, the OVA file is verified with Sophos Central, so it can only be used once. If you have to deploy a new VM, you must create the OVA file again in Sophos Central.
Warning
If you're deploying the OVA on an ESXi host running in an Enhanced vMotion Compatibility (EVC) cluster, EVC must be in Skylake or later mode.
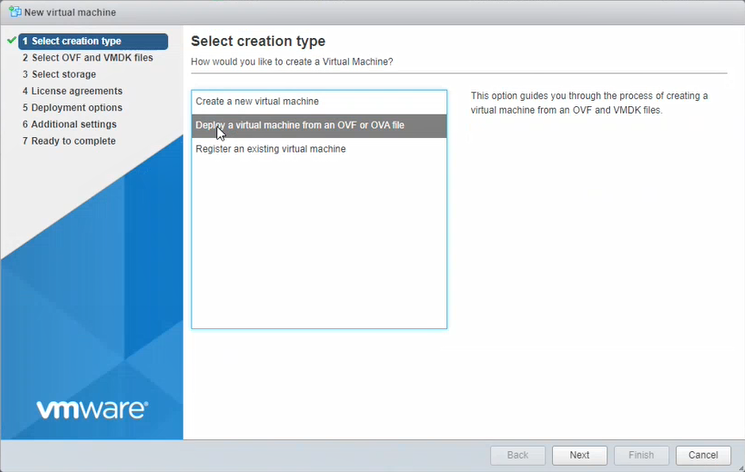
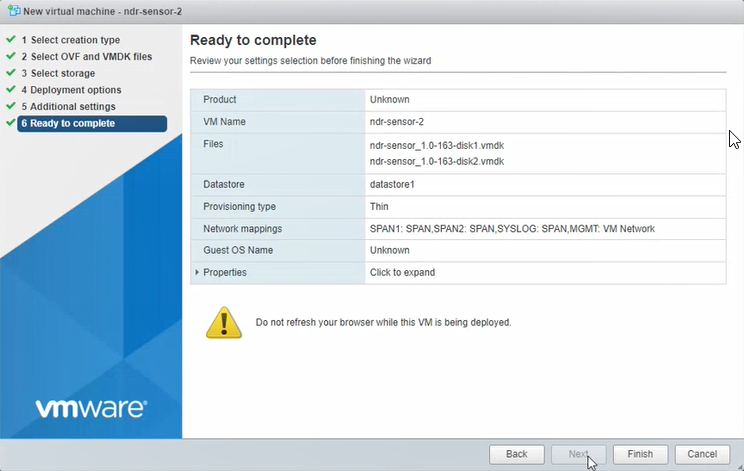
- Go into your ESXi host.
-
Select Virtual Machines and click Create/Register VM.
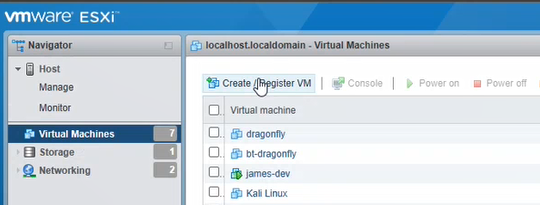
-
In Select creation type, select Deploy a virtual machine from an OVF or OVA file. Click Next.
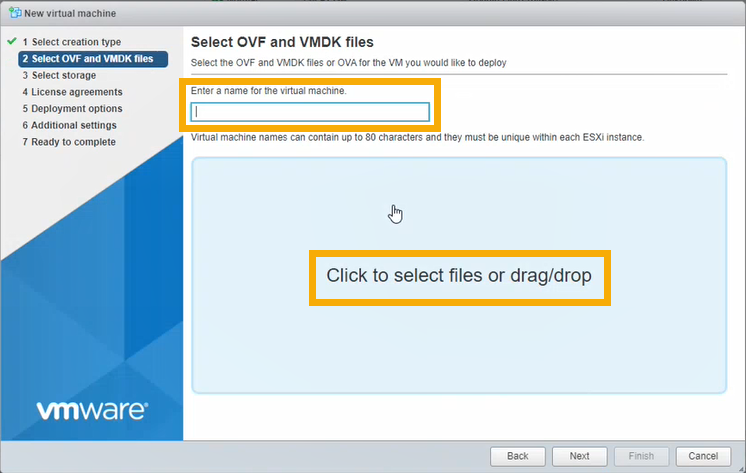
-
In Select OVF and VMDK files, enter a VM name.
Click the page to select files. Select the OVA file ndr-sensor.ova. Click Next.
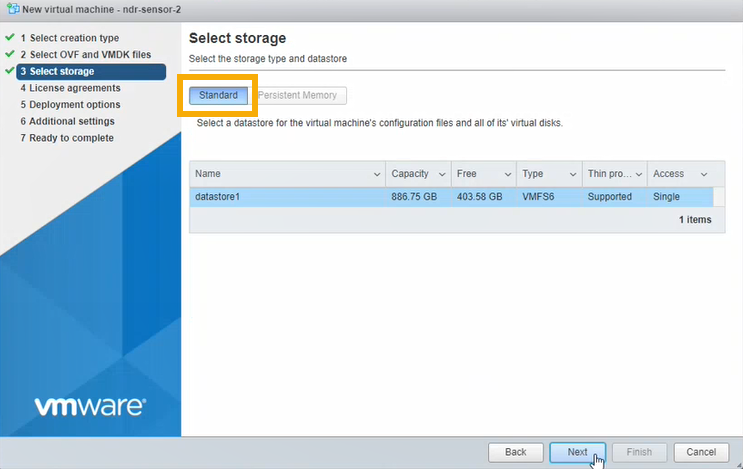
-
In Select storage, select Standard storage. Then select the datastore where you want to put your VM. Click Next.
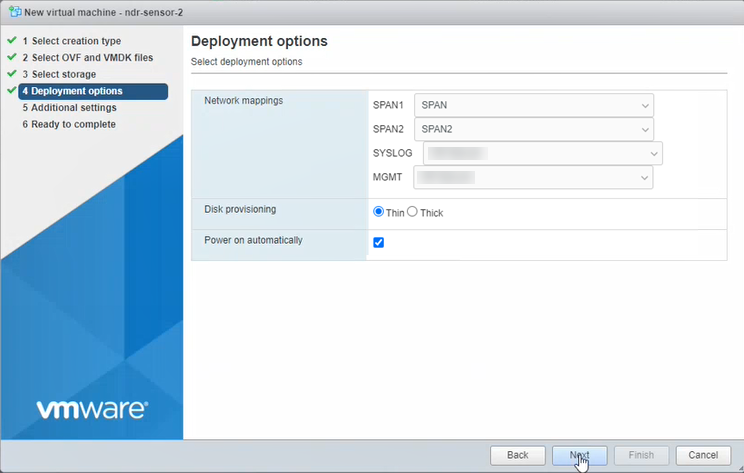
-
In Deployment options, enter settings as follows.
- In SPAN1, select the port group that will receive SPAN traffic for the NDR application. You configured this earlier. See Configure your switches.
-
In SPAN2, select a second port group that will receive SPAN traffic and needs monitoring (if you have one). For example, you might have a physical switch and a vSwitch that doesn't send traffic to the physical switch.
If you use SPAN2, you must increase the number of CPUs for the VM to at least 8. See Sophos NDR appliance size guide.
-
SYSLOG isn't needed for Sophos NDR. Select any port group as a placeholder and disconnect it in the VM settings later.
-
In MGMT, select the management interface. This interface lets the appliance send data to Sophos Central.
You set up this interface earlier in Sophos Central in Internet-facing network port settings.
If you selected DHCP during appliance setup, make sure the VM can get an IP address via DHCP.
-
In Disk Provisioning, make sure Thin is selected.
- Make sure Power on automatically is selected.
- Click Next.
-
Skip the Additional settings step.
-
Click Finish. Wait for the new VM to appear in the VMs list. This can take a few minutes.
-
Power on the VM and wait for the installation process to complete.
The VM boots for the first time and checks that it can connect to the correct vSwitches and to the internet. Then it reboots. This can take up to 10 minutes.
Warning
Don't interrupt this process.
-
In Sophos Central, go to the NDR Integrations page and refresh it. The VM's status is now Connected.

If the status of the VM is Connected but it doesn't appear to be working, check the status of the Dragonfly service in the Sophos VA console for NDR. See Sophos VA Console.
If you see in the console that the Dragonfly service is in Pending state, and your VM is in an Enhanced vMotion Compatibility (EVC) cluster, check that the EVC mode is Skylake or later.
The Sophos NDR VA doesn't support running in EVC clusters in Sandy Bridge mode.
The Zip file you downloaded in Sophos Central contains the files you need to deploy your VM: virtual drives, seed.iso, and a Powershell script.
To deploy the VM, do as follows:
- Extract the Zip file to a folder on your hard drive.
- Go to the folder, right-click the
ndr-sensor.ps1file, and select Run with PowerShell. -
If you see a Security Warning message, click Open to allow the file to run.
You're prompted to answer a series of questions.
-
Give the VM a name.
- The script shows the folder where the VM files will be stored. This is a new folder in your default installation location for virtual drives. Enter
Cto allow the script to create it. - Enter the number of processors (CPUs) to use for the VM.
- Enter the amount of memory to use in GB.
-
The script shows a numbered list of all your current vSwitches.
Select the vSwitch you want to attach the management interface to and enter its number. This interface lets the appliance send data to the Sophos Data Lake.
You set up this interface earlier in Sophos Central in Internet-facing network port settings.
If you selected DHCP during setup, make sure the VM can get an IP address via DHCP.

-
You don't need to enter a vSwitch for the syslog interface. This is only relevant for third-party product integrations.
Select any vSwitch as a placeholder and disconnect it in the VM settings later.
-
Select the vSwitch that will receive SPAN traffic for the NDR application. You configured this earlier. See Configure your switches.
-
Optionally, select a second vSwitch that will receive SPAN traffic and needs monitoring (if you have one). For example, you might have a physical switch and a vSwitch that doesn't send traffic to the physical switch.
If you use a second vSwitch, you must increase the number of CPUs for the VM to at least 8. See Sophos NDR appliance size guide.
-
The PowerShell script sets up the VM in Hyper-V. You'll see an Installation Completed Successfully message.
- Use any key to exit.
-
Open the Hyper-V Manager to see the VM added to the list of virtual machines. If you need to change any settings, you can. Then power it on.
The VM boots for the first time and checks that it can connect to the correct vSwitches and the internet. Then it reboots. This can take up to 10 minutes.
-
In Sophos Central, go to the Integrations page for the product you're integrating and refresh it. The VM's status is now Connected.